

Free Dragon Cross-Body Bag Crochet Pattern | Geek Purse
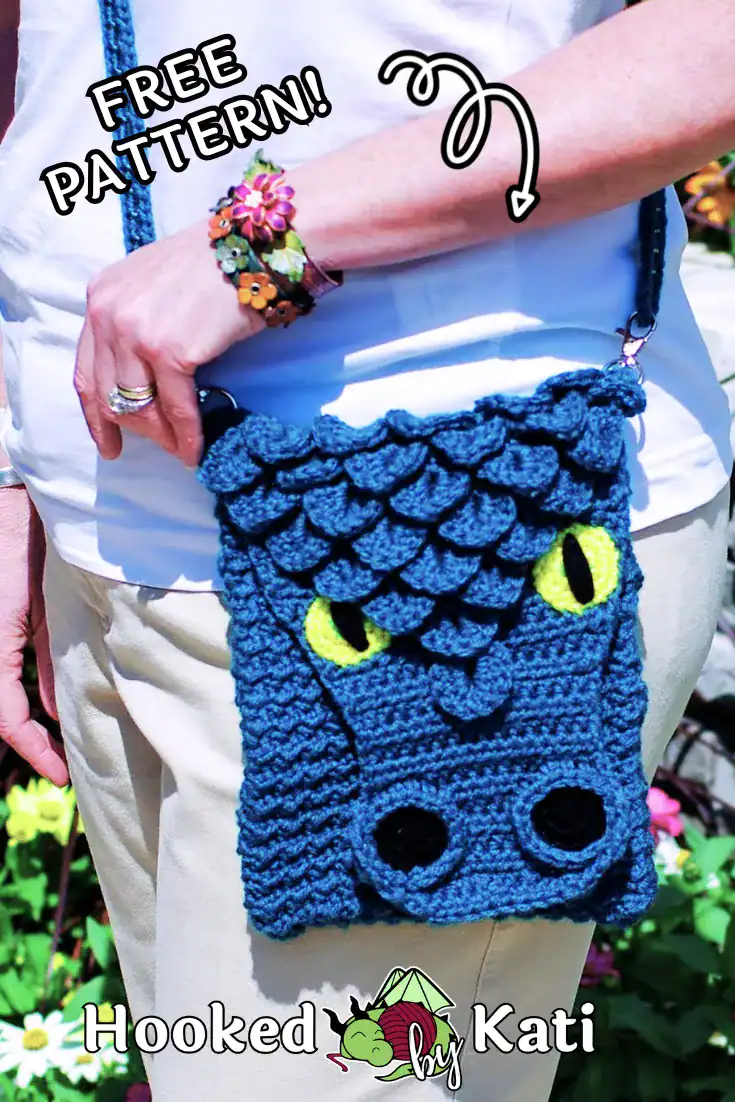
This free crochet pattern includes a design for a dragon face crossbody bag and two options for possible adjustable straps. This intermediate pattern features the dragon scale stitch and simple shaping.
The Dragon Cross-Body Bag was first published clear back in 2017. It was one of the first patterns I wrote and self published (even before Vincent the Dragon), and it is still one of my favorite accessories. The original found a home with a friend of my mother’s, but the first Frost Dragon version lives with my mom, the world’s biggest Game of Thrones fan. 🙂
While I wrote the first pattern with a chain strap (crocheting around the chain), I chose to add my favorite Tunisian crochet strap pattern to this post as well as an alterative to the chain strap. Both are adjustable, so it’s a great gift for all ages!
This geek-tastic bag is sturdy because the bottom is folded, not seamed like some bags. It holds more than it appears, and is a perfect satchel for Comic Con or Renaissance Faire. The whole face lifts up and acts as a full-length flap to open and close the bag.
Finally published as a free pattern, the Dragon Cross-Body Bag now includes both the original chain strap AND instructions for a Tunisian crochet strap that is both sturdy and adjustable. The Frost Dragon mods are also still available for free.
The original pattern, the Frost Dragon mods, and BOTH strap options are included in the newly revamped Premium Pattern PDF.
The majority of the pattern is easy shaping and simple flat work. The dragon scale (crocodile scale) stitch is the only thing that increase the difficulty of this pattern to intermediate.
Pattern Snapshot
- Finished Size: 9 inches long x 8 inches wide, strap is 44 inches long
- Skill Level: Intermediate
- Time to Make: Weekend Project (6–12 hours)
- Yarn: Worsted Weight Acrylic, Weight: 4
- Hook: H (5.00 mm), D (3.25 mm), and G (4.00 mm)
Originally published August 2017. Updated 2026.
Pin This Pattern For Later!
More FREE Dragon Crochet Patterns
Love dragons? Me too! –> All My Dragon Patterns
I also have a thing for purses –> Fantasy Purse Patterns
How To Crochet Your Dragon Cross Body Bag
- Make the flat part of your bag — the body and head that creates the flap on the outside.
- Choose your face modification — the original or the Frost Dragon mods.
- Choose your strap.
Get the Premium Pattern PDF
(or keep scrolling for the free version)
Make your crochet experience smoother, easier, and even more enjoyable.

Premium Patterns are available in the Hooked by Kati Shop, Ravelry, and Etsy.
The original pattern, the Frost Dragon mods, and BOTH strap options are included in the newly revamped Premium Pattern PDF.
Before You Start This Pattern
This pattern is written for confident beginners to intermediate crocheters. The body is a simple stitch worked back and forth and the facial pieces are easy pieces in the round. But the dragon scale (crocodile scale) stitch can be a challenge for beginners.
Dragon Cross-Body Bag | Free Crochet Pattern
Pattern is written in English, in US terms, using Craft Yarn Council abbreviations.
You Need to Know
Chains (ch), slip stitch (sl st), single crochet (sc), half double crochet (hdc), double crochet (dc), increases and decreases. Tunisian abbreviations will be forward pass (FwdP) and return pass (RetP). Experience with Tunisian crochet is helpful, but not necessary. Be eager to learn and ready to have fun!
For a quick refresher of these basic skills, go to www.hookedbykati.com/basics
You Will Practice Intermediate Techniques
- How to make a 3-dimensional object in crochet
- How to use pins to perfectly place and attach amigurumi parts
- How to shape using increases and decreases
- How to assemble amigurumi parts without sewing
Supplies
- Red Heart With Love yarn, 100% acrylic, worsted weight, 370 yds/7 oz/198 g, Mallard (Mall), 1 ball; Black (BLK), < 1 ball; Lettuce (LETT), < 1 ball; Daffodil (DAFF), < 1 ball.
- H (5.00mm) Furls crochet hook
- D (3.25 mm) Furls crochet hook (Strap Option 1)
- G (4.00 mm) Furls crochet hook (Strap Option 2)
- #200 Light-Duty Hobby Chain, nickel plated, 44 inches long (Strap Option 1)
- Two Swivel lanyard lobster claw clasps 1 5/8” x 1” (Strap Option 1)
- Two 1” D rings (Strap Option 2)
- One 1” adjustable slide buckle (Strap Option 2)
- Tapestry needle
- Straight pins
- Stitch markers
Gauge
10 sts x 10 rows in [sl st, hdc] pattern = 2.5 inches x 2.5 inches
Measurements
9 inches long x 8 inches wide, chain is 44 inches long.
Pattern Notes
- Work in rows, turning at the end of each row.
- For nostrils, eyes, and horns work in continuous rounds. Do not slip stitch unless otherwise specified by the pattern.
- For best results, assemble parts in order as directed.
- Ch-2 at beginning of row counts as dc.
- Slip Stitch loosely throughout pattern.
- Strap Option 2 is worked in Tunisian crochet. You will not need a different hook for this section. Tunisian crochet is similar to knitting in that you will pick up several loops on the forward pass (FwdP) and then work through those loops on a return pass (RetP) to finish the stitches. A FwdP and RetP count as one row.
- A video tutorial for the Tunisian Strap can be found on the YouTube channel.
- Weave in attachment ends at very end of project in case pieces require repositioning.
Special Stitches
- Hdc2tog – Half Double Crochet Two Together: Yarn over, insert hook through stitch, yo, insert hook through next st, yo, pull through all 5 loops on hook.
- Sc Join – Single Crochet Join: Slip knot in yarn, loop slip knot over hook, insert hook through stitch, yarn over, pull through, yarn over, pull through both loops on hook.
- Beg Scale-st – Beginning Scale Stitch: Ch 3, 4 dc around 1st post of V-st, stacking stitches down the post, rotate slightly, 5 dc around 2nd post of V-st, stacking stitches back up the post.
- Scale-st – Scale Stitch: 5 dc around 1st post of V-st, stacking stitches down the post, rotate slightly, 5 dc around 2nd post of V-st, stacking stitches back up the post.
Instructions
Thank you for reading the pattern here on my site! Your visits help support my work so I can keep creating more amigurumi designs, tutorials, and free resources for you. If you would like to save this for later, click the heart/star on your mobile browser or press CTRL + D on your keyboard to bookmark the page.
Bag
With MALL, using H hook, ch 31.
Row 1: Sl st in second ch from hook (See Pattern Notes), hdc, [sl st, hdc] across, turn. (30)
Rows 2-78: Ch 1, [sl st, hdc] across, turn. (30)
Rows 79-80: Ch 1, hdc across, turn. (30)
Row 81: Ch 1, hdc2tog (See Special Stitches), hdc to last 2 sts, hdc2tog, turn. (28)
Rows 82-83: Ch 1, hdc across, turn. (28)
Row 84: Ch 1, hdc2tog, hdc to last 2 sts, hdc2tog, turn. (26)
Row 85: Ch 1, hdc across, turn. (26)
Row 86: Ch 1, hdc2tog, hdc to last 2 sts, hdc2tog, turn. (24)
Row 87: Ch 1, hdc across, turn. (24)
Row 88: Ch 1, hdc2tog, hdc to last 2 sts, hdc2tog, turn. (22)
Row 89: Ch 1, hdc2tog, hdc to last 2 sts, hdc2tog, turn. (20)
Row 90: Ch 1, hdc across, turn. (20)
Row 91: Ch 1, hdc2tog, hdc to last 2 sts, hdc2tog, turn. (18)
Row 92: Ch 1, hdc across, turn. (18)
Row 93: Ch 1, hdc2tog, hdc to last 2 sts, hdc2tog, turn. (16)
Rows 94-98: Ch 1, hdc across, turn. (16)
Row 99: Ch 1, 2 hdc in 1st st, hdc across to last st, 2 hdc in last st, turn. (18)
Row 100: Ch 1, 3 hdc in 1st st, hdc across to last st, 3 hdc in last st, turn. (22)
Rows 101-102: Ch 1, hdc across, turn. (22)
Row 103: Ch 1, hdc2tog, hdc to last 2 sts, hdc2tog, turn. (20)
Row 104: Ch 1, hdc2tog, hdc to last 2 sts, hdc2tog, turn. (18)
Row 105: Ch 1, hdc2tog, 3 hdc, hdc2tog, 4 hdc, hdc2tog, 3 hdc, hdc2tog, turn. (14)
Row 106: Ch 1, hdc2tog, 2 hdc, hdc2tog, 2 hdc, hdc2tog, 2 hdc, hdc2tog. (10)
Bind off and weave in ends.
Fold bag, matching row 1 to row 78 (folding body section in half), leaving the head portion loose. Pin sides together.
With MALL, working though both layers, Sc Join (see Special Stitches), sc down the side to folded end. Bind off and weave in ends. Repeat on other side.
Ridges
With MALL, using H hook, ch 5.
Row 1: Dc in 5th ch from hook, turn. (1 V-st)
Row 2: Beg scale-st (see Special Stitches), turn. (1 scale)
Row 3: ch 2, sl st in center of scale, (ch 4, dc) in center of scale, turn. (1 V-st)
Row 4: Beg Scale-st, turn. (1 scale)
Row 5: Ch 4, dc at base of ch, ch 2, sc in center of scale, ch 2, (dc, ch 1, dc) in 3rd ch of beg scale-st, turn. (2 V-sts)
Row 6: Beg scale-st, sc in sc, scale-st (see Special Stitches), turn. (2 scales)
Row 7: Ch 4, dc in base of ch, ch 2, sc in center of scale, ch 2. (dc, ch 1, dc) in sc between scales, ch 2, sc in center of scale, ch 2, (dc, ch 1, dc) in 3rd ch of beg scale-st, turn. (3 V-sts)
Row 8: Beg scale st, sc in sc, scale-st, sc in sc, scale-st, turn. (3 scales)
Row 9: Ch 4, dc in base of ch, ch 2, sc in center of scale, ch 2, [(dc, ch 1, dc) in sc between scales, ch 2, sc in sc, ch 2] twice, (dc, ch 1, dc) in 3rd ch of beg scale-st, turn. (4 V-sts)
Row 10: Beg scale-st, [sc in sc, scale-st] three times, turn. (4 scales)
Row 11: Ch 4, dc in base of ch, ch 2, sc in center of scale, ch 2, [(dc, ch 1, dc) in sc between scales, ch 2, sc in sc, ch 2] three times, (dc, ch 1, dc) in 3rd ch of beg scale-st, turn. (5 V-sts)
Row 12: Beg scale-st, [sc in sc, scale-st] four times, turn. (5 scales)
Row 13: Ch 4, dc in base of ch, ch 2, sc in center of scale, ch 2, [(dc, ch 1, dc) in sc between scales, ch 2, sc in sc, ch 2] four times, (dc, ch 1, dc) in 3rd ch of beg scale-st, turn. (6 V-sts)
Row 14: Beg scale-st, [sc in sc, scale-st] five times, turn. (6 scales)

Row 15: Ch 3, sc in top of scale, [ch 2, (dc, ch 1, dc) in sc between scales, ch 2, sc in top of scale] 5 times, turn. (5 V-sts)
Row 16: [Scale-st, sc in sc] 5 times. (5 scales)
Bind off leaving long tail for sewing. Using tail, sew to first row of hdc (Row 79), tack down point of triangle to nose with starting tail.
Nostrils
(Make 2)
With BLK, using H hook, ch 2.
Rnd 1: 6 sc in second ch from hook. (6)
Rnd 2: [2 sc in next st] 6 times. (12)
Rnd 3: [sc, 2 sc in next st] 6 times. (18)
Rnd 4: Switch to MALL. Hdc 14, sc 4.
Bind off leaving long tail for sewing.
Sew nostrils to nose, fitting them on top of the shaped parts of the nose, angling the scs down and toward the center. See around posts of hdc stitches so the thick edges stand up. Whipstitch the 4 sc.
Eyes
(Make 2)
With LETT, using H hook, ch 2.
Rnd 1: 6 sc in second ch from hook. (6)
Rnd 2: Switch to DAFF, [2 sc in next st] 6 times. (12)
Rnd 3: [Sc, 2 sc in next st] 6 times. (18)
Bind off, leaving long tail for sewing.
Using black, sew straight line from one side to the other. Repeat four more times through same stitches.
Using DAFF tail, sew to face, slit pupils facing vertically. Position just under the edge of ridges so that the ridges overlap the eyes slightly.
Strap Option 1 (Crochet Around A Chain)
Chain
With MALL, using D hook, sc join in end of chain.
Rnd 1: Sc 5 in 1st link of chain, 2 sc in every link to end, straightening chain as you go so stitches are on the same side, 6 sc in last link, 2 sc in every link down other side. Sl st to join. Bind off and weave in ends.
Clasps
Work around flat bar of clasp and edge of bag at the joining seam. Do not work into hdc rows.
Rnd 1: With MALL, using D hook, sc join, 4 sc. (5)
Bind off and weave in ends. Repeat on other side.
Use clasps to attach chain to bag. Attach at any chain link to adjust length.
Strap Option 2 (Tunisian Crochet)
Strap
(see Pattern Notes)
With MALL, using G hook, ch 6, leaving long starting tail for sewing.
Row 1: (FwdP) Pull up a loop in second ch from hook, pull up a loop in each of next 4 chs, do not turn. (6 loops on hook)
Row 1: (RetP) [Yarn over, pull through 2 loops on hook] 5 times, do not turn.
Row 2: (FwdP) Insert hook behind 2nd vertical bar and pull up a loop, pull up a loop from each vertical bar across. Be sure to pull up a loop from last vertical bar. (6 loops on hook)
Row 2: (RetP) [Yarn over, pull through 2 loops on hook] 5 times, do not turn.
Repeat Row 2 (FwdP and RetP) until strap measures 56 inches long. (About 220 rows)
Bind off leaving long tail for sewing.
D-Ring Loops
(Make 2)
Checkboxes for duplicate parts are in red.
With MALL, using G hook, ch 5, leaving long starting tail for sewing.
Row 1: (FwdP) Pull up a loop in second ch from hook, pull up a loop in each of next 3 chs, do not turn. (5 loops on hook)
Row 1: (RetP) [Yarn over, pull through 2 loops on hook] 4 times, do not turn.
Row 2: (FwdP) Insert hook behind 2nd vertical bar and pull up a loop, pull up a loop from each vertical bar across. Be sure to pull up a loop from last vertical bar. (5 loops on hook)
Row 2: (RetP) [Yarn over, pull through 2 loops on hook] 4 times, do not turn.
Rows 3-10: Repeat Row 2 (FwdP and RetP) eight more times.
Bind off leaving long tail for sewing.
Strap Assembly and Attachment
Fold about 4 rows of one end of the strap up through one side of the adjustable buckle and down on the other side of the middle bar, wrong side to wrong side. Using end tail, sew the strap to itself, wrong side to wrong side, so it is wrapped around the center post of the adjustable buckle and secure.
Thread the free end of the strap through D ring until it is about 12” from the buckle. Be sure it is right side out.
Being careful not to twist, thread the free end of the strap up through the adjustable buckle, over the end attachment, and down the other side of the buckle. Pull free end through until the loop between the purse and buckle is about 12” long.
Being careful not to twist, fold about 4 rows of the free end of strap inside to inside around the flat end of the other D ring. Using end tail, sew the strap to itself, wrong side to wrong side, so it is wrapped around the D ring and secure.
Open the purse to expose the inside edges. Hold one D-Ring Loop to the inside edge of the purse in the gap along the seam of the purse. Sew one end of flap with right side facing the outside the purse, down each side and across the end to secure it to the purse. The loop will cover the seam exposed on the edge of the purse.
With right side of strap facing out, insert loop through either D ring and fold in half to enclose the rounded side of the D ring. Sew other end of loop to the first end of the loop, down each side and across the end.
Being careful not to twist, repeat on other side of purse with D ring on other end of the strap.
Weave in all attachment ends when parts are positioned as desired.
© Hooked by Kati LLC 2017-2026
Crochet Pattern FAQ
A: Yes! This is a free crochet pattern you can use directly on the blog. It includes all instructions needed to complete the project without purchasing the PDF.
I think of my free crochet patterns a bit like a fun-size candy bar—same great ingredients, just a smaller experience. They’re complete patterns meant to be followed right from the blog, but they also give you a chance to see whether my pattern-writing style works for the way you crochet before investing in one of my premium designs.
If you prefer the king-size experience, the printable PDF versions include color photos, progress check boxes, and extra guidance for trickier sections. Available at shop.hookedbykati.com.
A: This pattern is written for intermediate crocheters, though it also uses some easy or beginner skills. The only part that may be tricky for a beginner is the scale stitches.
A: You may sell finished items made from this pattern, but you may not redistribute or sell the pattern itself. This ensures free patterns remain accessible while respecting the designer’s work.
Read through the pattern notes carefully and check the tutorial links included in the pattern. You can leave a comment on the pattern post and Kati, the designer, will do her best to help. You can also email the designer at kati@hookedbykati.com. The Facebook Group is also very helpful as many of the people in it have finished a HbK pattern (if not several).
More Dragon Crochet Patterns
Dragon Eye Tote Bag (another great dragon bag for when you need more room for books!)
The Best Dragon Amigurumi Patterns
Share Your Work!
Post your finished project in the Gallery! Use #hookedbykati or tag @hookedbykati on social media.
Join the community in the Epic Amigurumi Patterns & Crochet Inspiration Facebook Group to share your progress or ask questions.
You may sell items made from this pattern. Please credit Hooked by Kati.
Do not copy, sell, or distribute this pattern — it’s protected and a lot of work goes into each design!
If you run into a snag, reach out — I’m always happy to help! I answer emails Monday – Friday. 8-5.

Kati is a crochet pattern designer, dragon obsessive, and certified geek who has been turning yarn into fantasy creatures since 2016. Her patterns lean heavily toward dragons, fantasy beasts, and whatever her brain decides is a good idea at 2am. She is proudly anti-AI crochet and very pro-finishing-your-WIPs (she’s working on it). When she’s not crocheting something with too many horns, she’s probably watching something nerdy or playing dog agility with her two American Hairless Terriers. Want to work together or just say hi? Contact her here.