
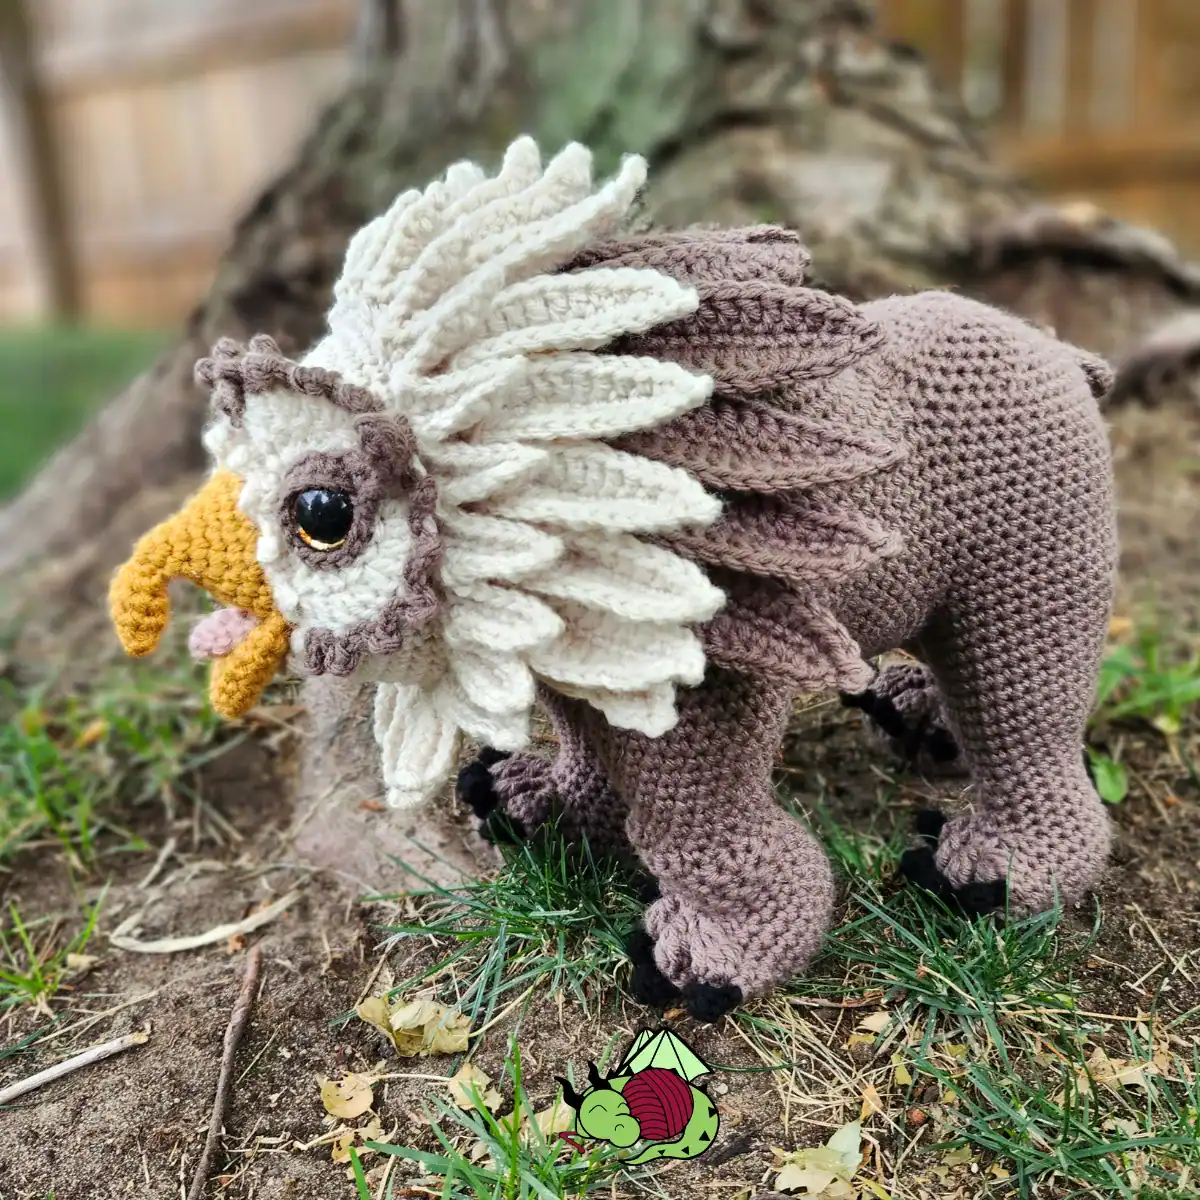
Free Owlbear Crochet Pattern, Roy | Fantasy D and D Amigurumi
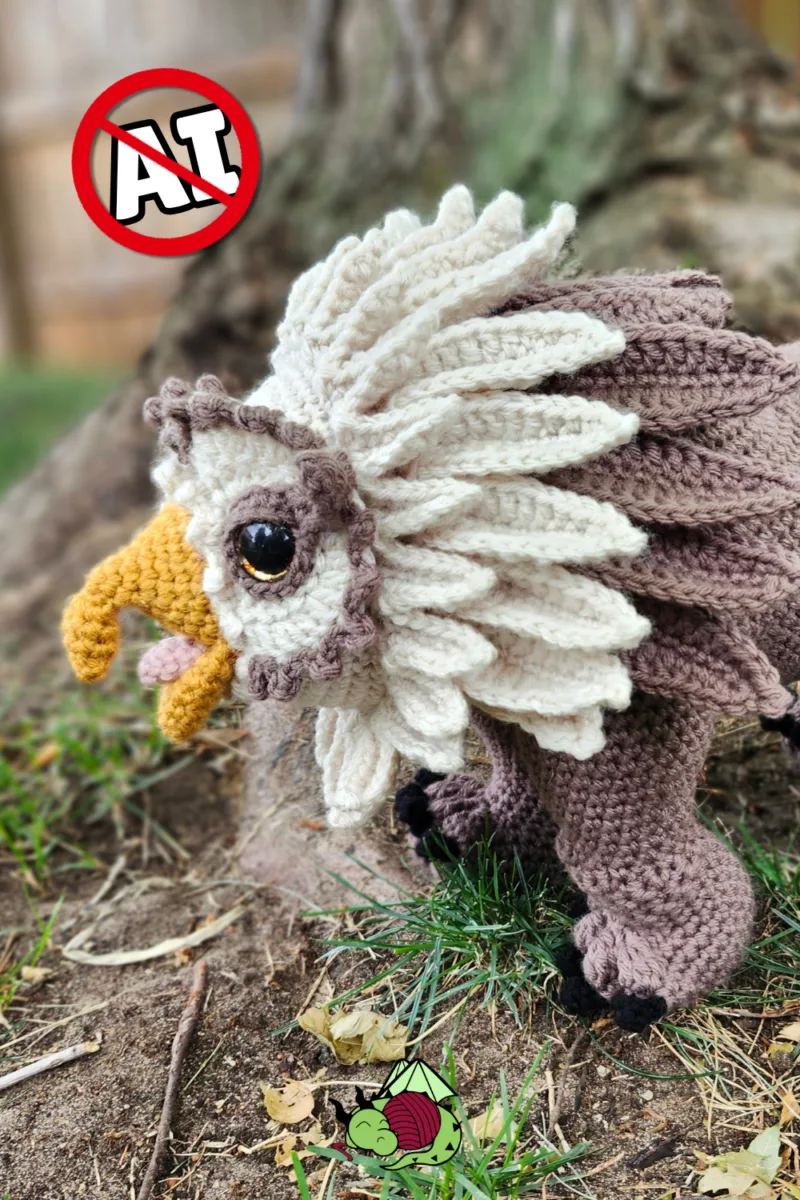
This free crochet pattern includes the text instructions to make an amigurumi owlbear, a creature of Dungeons & Dragons origin that is both wise and strong. All Hooked by Kati patterns are designed, written, and tested by humans, without the use of generative AI.
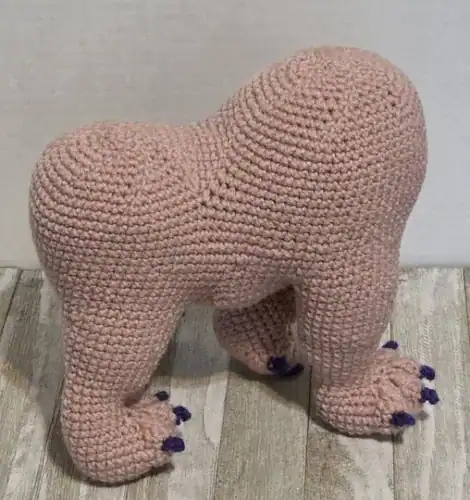
This pattern was a long time coming. Before I finally finished it, the no-sew body was part of my amigurumi design course. It was featured in the section on how to make bottom-up quadrupeds.
When I started designing, I knew I wanted to make a bear body with big clunky feet and long claws, but I also HATE sewing. The feet needed to be all one piece — including no-sew claws, but I also needed to be able to do them first, so the legs could all be different.
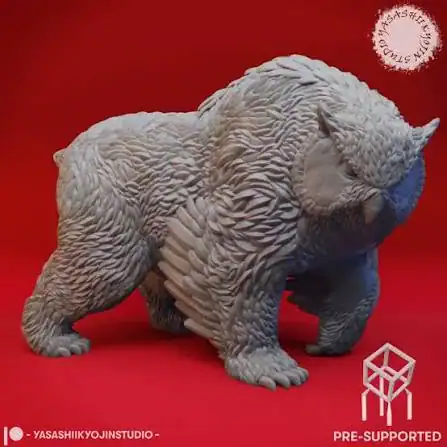
The images I used for inspiration were mostly D&D images, but my favorite one was of an owlbear walking. It was actually a 3D print file for a tabletop miniature, and it was the image I kept coming back to to shape and plan the legs and shape of the body. I decided that my owlbear would also be in mid-stride. Logically, one foot would need to be completely off the ground, but for support reasons, I made that foot just bend at the ankle with the toes on the ground, like the tabletop miniature.
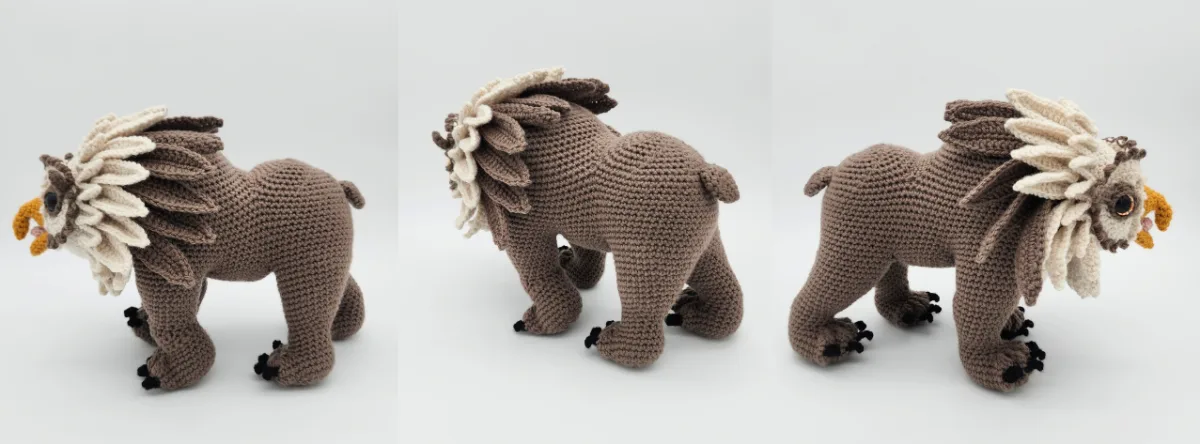
The owlbear crochet pattern is an Advanced pattern, although I have done my best to make it as easy as possible to follow. If you know your increase and decrease and use stitch markers, you can take it stitch-by-stitch and have a very nice result with this project.
That is the coolest part about no-sew pieces — they come together with more accuracy and fewer places the pattern can stray from the original. You’ll love this bear body! From the big clunky feet to the round bear badonkadonk and big, shoulders, this guy is a real joy to crochet.
Pattern Snapshot
- Finished Size: 16” long x 12” tall x 10” wide
- Skill Level: Advanced
- Time to Make: Multi-Session Project (12+ hours)
- Yarn: Worsted Weight Acrylic, Weight: 4
- Hook: G (4.00 mm)
Pin This Pattern For Later!
More FREE Fantasy Creature Crochet Patterns
Amigurumi Inspired By Dungeons & Dragons –> D&D Creature Patterns
Love dragons? Me too! –> All My Dragon Patterns
So many mythical creatures! –> All Fantasy Creature Patterns
How To Crochet Your Owlbear
- You’ll create 4 legs and a belly, the use simple no-sew methods to attach them together.
- Work around the outside of the legs and belly, then you’ll chain across and close the back into a round bum.
- The head is a no-sew head as well. All the feathers are made right on the head! NO SEWING!
- At the end, you’ll sew on the eyebrows and tail, then sew the head to the shoulders and you’re done!
Get the Premium Pattern PDF
(or keep scrolling for the free version)
Make your crochet experience smoother, easier, and even more enjoyable.

Premium Patterns are available in the Hooked by Kati Shop, Ravelry, and Etsy.
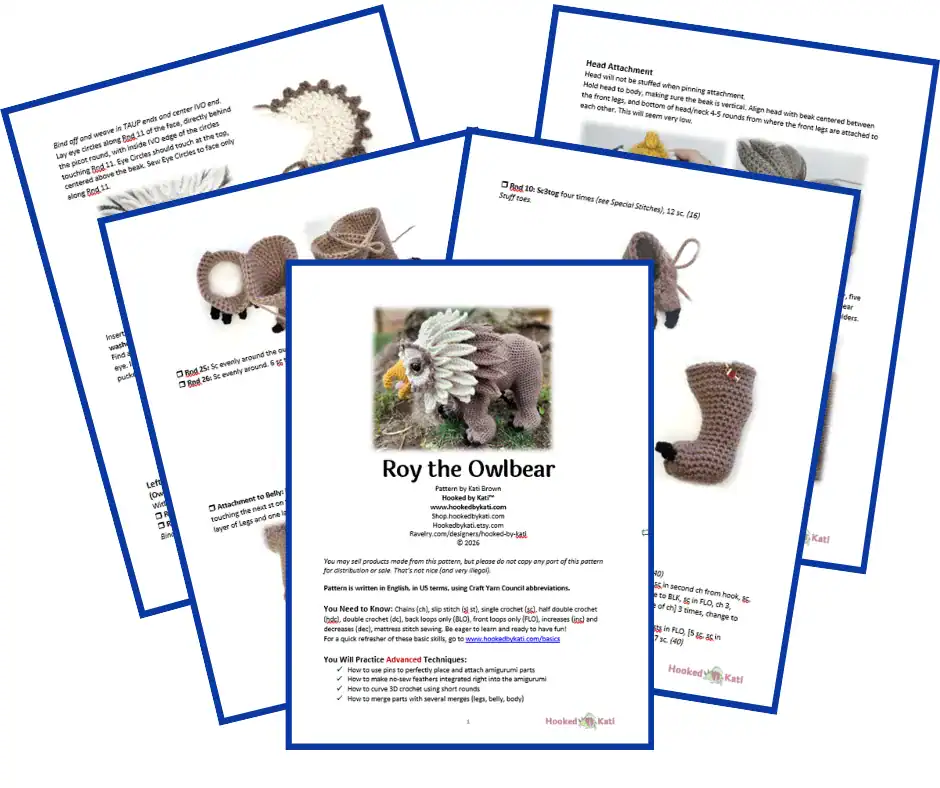
The printable PDF contains 23 pages and 56 color tutorial photos!
Before You Start This Pattern
The owlbear crochet pattern is an Advanced pattern, although I have done my best to make it as easy as possible to follow. If you know your increase and decrease and use stitch markers, you can take it stitch-by-stitch and have a very nice result with this project.
Worsted weight acrylic or cotton yarn works best for most amigurumi patterns. Using a smaller hook than recommended will help create tight stitches with fewer gaps.
Roy the Owlbear | Free Crochet Pattern
Pattern is written in English, in US terms, using Craft Yarn Council abbreviations.
You Need to Know
Chains (ch), slip stitch (sl st), single crochet (sc), half double crochet (hdc), double crochet (dc), back loops only (BLO), front loops only (FLO), increases (inc) and decreases (dec), mattress stitch sewing. Be eager to learn and ready to have fun!
For a quick refresher of these basic skills, go to www.hookedbykati.com/basics
You Will Practice Advanced Techniques
- How to use pins to perfectly place and attach amigurumi parts
- How to make no-sew feathers integrated right into the amigurumi
- How to curve 3D crochet using short rounds
- How to merge parts with several merges (legs, belly, body)
Supplies
- Big Twist Value yarn, 100% acrylic, worsted weight, 380 yds/6 oz/170 g, Taupe (TAUP), 1 ball; Ivory (IVO), 1 ball; Black (BLK), < 1 ball; Varsity Gold (GOLD), < 1 ball; Blush Pink (PNK), < 1 ball.
- G (4.00 mm) Furls hook
- Two 25mm colored round-pupil safety eyes
- Polyfil stuffing
- Tapestry needle
- Straight pins
- Stitch markers Blocking board (optional)
Measurements
16” long x 12” tall x 10” wide
Gauge
8 sts x 8 rows in sc = 2” x 2”
Pattern Notes
- Work in continuous rounds. Do not slip stitch unless otherwise specified by the pattern.
- For best results, assemble parts in order as directed.
- Weave in attachment ends at very end of project in case pieces require repositioning.
- Rounds labeled “Short round” are worked back and forth and will end before the round is complete, leaving stitches deliberately unworked to be worked in later rounds as instructed.
- When instructed, an additional sc(s) will be added at the end of a round to move the starting stitch of the next round to the left (clockwise). This does not change the stitch count of the round. It only moves the starting point.
- On Eye Circles, ch-2 at beginning of row counts as a dc.
Special Stitches
- Dc5tog – Double crochet 5 together – [Yo, insert hook through next st, yo, pull up a loop, yo, pull through 2 loops on hook] 5 times, yo, pull through all 6 loops on the hook.
- Sc3tog – Single crochet 3 together – [Insert hook through next st, yo, pull up a loop] 3 times, yo, pull through all 4 loops on the hook.
- Sc join – Single crochet join: With long starting tail, make slip knot in yarn, loop slip knot over hook, insert hook through stitch, yo, pull through, yarn over, pull through both loops on hook. Leave starting tail on outside of work.
- Picot – Picot: Ch 3, sl st in 3rd ch from hook.
- Foundation sc – Foundation Single Crochet: Insert hook into base of last st, pull up a loop, yo, pull through one loop, yo, pull through two loops on hook. Insert hook into new loop beneath previous sc, pull up a loop, yo, pull through one loop, yo, pull through two loops on hook. Repeat.
Instructions
Thank you for reading the pattern here on my site! Your visits help support my work so I can keep creating more amigurumi designs, tutorials, and free resources for you. If you would like to save this for later, click the heart/star on your mobile browser or press CTRL + D on your keyboard to bookmark the page.
Belly
With TAUP, ch 2.
Rnd 1: 6 sc in second ch from hook. (6)
Rnd 2: Inc in each st around. (12)
Rnd 3: [Sc, inc] 6 times. (18)
Rnd 4: [2 sc, inc] 6 times. (24)
Rnd 5: [3 sc, inc] 6 times. (30)
Rnd 6: [4 sc, inc] 6 times. (36)
Rnd 7: [5 sc, inc] 6 times. (42)
Rnd 8: [6 sc, inc] 6 times. (48)
Bind off and weave in ends.
Set aside.
Front Right Leg
With TAUP, ch 2.
Rnd 1: 6 sc in second ch from hook. (6)
Rnd 2: Inc in each st around. (12)
Rnd 3: [Sc, inc] 6 times. (18)
Rnd 4: [2 sc, inc] 6 times. (24)
Rnd 5: Sc evenly around.
Rnd 6: 2 sc, 5 dc in next st, [sc, 5 dc in next st] 3 times, 15 sc. (40)
Rnd 7: 4 sc, change to BLK, sc in FLO, ch 3, working down ch, 2 sc in second ch from hook, sc, sc in FLO at base of ch, [change to TAUP, 5 sc in both loops, change to BLK, sc in FLO, ch 3, working down ch, 2 sc in second ch from hook, sc, sc in FLO at base of ch] 3 times, change to TAUP, 17 sc. (44 sc, 4 claws)
Rnd 8: 4 sc, sc in exposed back loop of Rnd 6, do not work 2 BLK sts in FLO, [5 sc, sc in exposed back loop of Rnd 6] 3 times, 17 sc. (40)
Rnd 9: 2 sc, dc5tog (see Special Stitches), [sc, dc5tog] 3 times, 15 sc. (24)
Rnd 10: Sc3tog four times (see Special Stitches), 12 sc. (16)
Stuff toes.
Rnds 11-12: Sc evenly around.
Begin stuffing foot.
Rnd 13: [7 sc, inc] twice. (18)
Rnd 14: Sc evenly around.
Rnd 15: [5 sc, inc] 3 times. (21)
Rnd 16: Sc evenly around.
Rnd 17: [6 sc, inc] 3 times. (24)
Rnd 18-19: Sc evenly around.
Rnd 20: [Sc, inc] 5 times, 5 sc, sc3tog, 6 sc. (27)
Rnds 21-23: Sc evenly around.
Mark 1st st of next rnd.
Bind off and weave in ends.
Stuff.
Front Left Leg and Attachment
With TAUP, ch 2.
Rnd 1: 6 sc in second ch from hook. (6)
Rnd 2: Inc in each st around. (12)
Rnd 3: [Sc, inc] 6 times. (18)
Rnd 4: [2 sc, inc] 6 times. (24)
Rnd 5: Sc evenly around.

Rnd 6: 2 sc, 5 dc in next st, [sc, 5 dc in next st] 3 times, 15 sc. (40)
Rnd 7: 4 sc, change to BLK, sc in FLO, ch 3, working down ch, 2 sc in second ch from hook, sc, sc in FLO at base of ch, [change to TAUP, 5 sc in both loops, change to BLK, sc in FLO, ch 3, working down ch, 2 sc in second ch from hook, sc, sc in FLO at base of ch] 3 times, change to TAUP, 17 sc. (44 sc, 4 claws)
Rnd 8: 4 sc, sc in exposed back loop of Rnd 6, do not work 2 BLK sts in FLO, [5 sc, sc in exposed back loop of Rnd 6, do not work 2 BLK sts in FLO] 3 times, 17 sc. (40)
Rnd 9: 2 sc, dc5tog, [sc, dc5tog] 3 times, 15 sc. (24)
Rnd 10: Sc3tog four times, 12 sc. (16)
Stuff toes.
Rnd 11: Sc evenly around. 10 sc to move starting st (see Pattern Notes), turn.
Rnd 12: (WS) (Short Rnd) (see Pattern Notes) Do not chain, 14 sc, leave remaining 2 sts unworked, turn. (14)
Rnd 13: (RS) (Short Rnd) Do not chain, 12 sc, leave remaining 2 sts unworked, turn. (12)
Rnd 14: (WS) (Short Rnd) Do not chain, 10 sc, leave remaining 2 sts unworked, turn. (10)
Rnd 15: (RS) (Short Rnd) Do not chain, 8 sc, leave remaining 2 sts unworked, turn. (8)
Rnd 16: (WS) (Short Rnd) Do not chain, 6 sc, leave remaining 2 sts unworked, turn. (6)
Rnd 17: (RS) (Short Rnd) Do not chain, 4 sc, leave remaining 2 sts unworked, turn. (4)
Rnd 18: (WS) (Short Rnd) Do not chain, 2 sc, leave remaining 2 sts unworked, turn. (2)
Rnd 19: (RS) (Short Rnd) Do not chain, 2 sc, do not turn. (2)
Rnd 20: (RS) Working around including unworked sts from previous rounds, 16 sc. (16)
Rnd 21: [7 sc, inc] twice. (18)
Rnd 22: [5 sc, inc] 3 times. (21)
Rnd 23: Sc evenly around.
Rnd 24: [6 sc, inc] three times. (24)
Rnd 25: Sc evenly around.
Rnd 26: [7 sc, inc] three times. (27)
Stuff foot and knee.
Rnd 27: Sc evenly around, 5 sc to move starting st, ch 3.
Rnd 28 will attach front legs together with a ch-3 gap between them.
Rnd 28: 27 sc around last rnd of Right Front Leg, 3 sc in next 3 chs, 27 sc around Left Front Leg, 3 sc in back of 3 chs. (60)
Rnds 29-30: Sc evenly around.
Place markers in 24th st and 35th st. These should be centered at the back of the legs with 10 sts between them.
Bind off and weave in ends.
Set aside.
Right Rear Leg
With TAUP, ch 2.
Rnd 1: 6 sc in second ch from hook. (6)
Rnd 2: Inc in each st around. (12)
Rnd 3: [Sc, inc] 6 times. (18)
Rnd 4: [2 sc, inc] 6 times. (24)
Rnd 5: Sc evenly around.
Rnd 6: 2 sc, 5 dc in next st, [sc, 5 dc in next st] 3 times, 15 sc. (40)
Rnd 7: 4 sc, change to BLK, sc in FLO, ch 3, working down ch, 2 sc in second ch from hook, sc, sc in FLO at base of ch, [change to TAUP, 5 sc in both loops, change to BLK, sc in FLO, ch 3, working down ch, 2 sc in second ch from hook, sc, sc in FLO at base of ch] 3 times, change to TAUP, 17 sc. (44 sc, 4 claws)
Rnd 8: 4 sc, sc in exposed back loop of Rnd 6, do not work 2 BLK sts in FLO, [5 sc, sc in exposed back loop of Rnd 6, do not work 2 BLK sts in FLO] 3 times, 17 sc. (40)
Rnd 9: 2 sc, dc5tog, [sc, dc5tog] 3 times, 15 sc. (24)
Rnd 10: Sc3tog four times, 12 sc. (16)
Stuff toes.
Rnds 11-12: Sc evenly around.
Rnd 13: Sc, inc 3 times, 6 sc, dec, 4 sc. (18)
Rnd 14: 2 sc, [inc, sc] 3 times, 5 sc, dec, 3 sc. (20)
Rnd 15: 3 sc, [inc, 2 sc] 3 times, 4 sc, dec, 2 sc. (22)
Rnd 16: 4 sc, [inc, 3 sc] 3 times, 3 sc, dec, sc. (24)
Stuff foot.
Rnd 17: Sc evenly around.
Rnd 18: 7 sc, [inc, sc] 3 times, 11 sc. (27)
Rnd 19: Sc evenly around.
Rnd 20: 8 sc, [inc, 2 sc] 3 times, 10 sc. (30)
Rnd 21: Sc evenly around.
Rnd 22: 9 sc, [inc, 3 sc] 3 times, 9 sc. (33)
Rnds 23-24: Sc evenly around.
Bind off and weave in ends.
Place markers in 7th st and 14th st. Markers will have 6 sts between them. Markers will be on the left side of the leg, and slightly toward the front.
Left Rear Leg
With TAUP, ch 2.
Rnd 1: 6 sc in second ch from hook. (6)
Rnd 2: Inc in each st around. (12)
Rnd 3: [Sc, inc] 6 times. (18)
Rnd 4: [2 sc, inc] 6 times. (24)
Rnd 5: Sc evenly around.
Rnd 6: 2 sc, 5 dc in next st, [sc, 5 dc in next st] 3 times, 15 sc. (40)
Rnd 7: 4 sc, change to BLK, sc in FLO, ch 3, working down ch, 2 sc in second ch from hook, sc, sc in FLO at base of ch, [change to TAUP, 5 sc in both loops, change to BLK, sc in FLO, ch 3, working down ch, 2 sc in second ch from hook, sc, sc in FLO at base of ch] 3 times, change to TAUP, 17 sc. (44 sc, 4 claws)
Rnd 8: 4 sc, sc in exposed back loop of Rnd 6, do not work 2 BLK sts in FLO, [5 sc, sc in exposed back loop of Rnd 6, do not work 2 BLK sts in FLO] 3 times, 17 sc. (40)
Rnd 9: 2 sc, dc5tog (see Special Stitches), [sc, dc5tog] 3 times, 15 sc. (24)
Rnd 10: sc3tog four times, 12 sc. (16)
Stuff toes.
Rnd 11: Sc evenly around.
Rnd 12: Sc, dec, 6 sc, inc 3 times, 4 sc. (18)
Rnd 13: Sc, dec, 6 sc, [inc, sc] 3 times, 3 sc. (20)
Rnd 14: Dec, 7 sc, [inc, 2 sc] 3 times, 2 sc. (22)
Rnd 15: Dec, 7 sc, [inc, 3 sc] 3 times, sc. (24)
Rnd 16: Sc evenly around.
Rnd 17: 11 sc, [inc, sc] 3 times, 7 sc. (27)
Rnd 18: Sc evenly around.
Rnd 19: 12 sc, [inc, 2 sc] 3 times, 6 sc. (30)
Rnd 20: Sc evenly around.
Rnd 21: 13 sc, [inc, 3 sc] 3 times, 5 sc. (33)
Rnd 22: Sc evenly around.
Rnd 23: 14 sc, [inc, 4 sc] 3 times, 4 sc. (36)
Rnd 24: Sc evenly around. 15 sc to move starting st, turn. (36)
Attachment to Other Hind Leg: Hold Hind Right Leg to Hind Left Leg with both sets of toes facing forward, RS to RS. Align so the 1st marker on Right Leg is touching the next st on the Left Leg. Working through one layer of Left Leg and one layer of Right Leg, 8 sc, from marker to marker. Do not work these attachment sts going forward. Work around the outside of the legs.
Rnd 25: Sc evenly around the outside of both legs. (53)
Rnd 26: Sc evenly around. 6 sc to move starting st, turn. (53)
Attachment to Belly: Hold Belly to Hind Legs, RS to RS. Align so the last st of the Belly is touching the next st on the hind legs. Hold work with legs nearest to you. Working through one layer of Legs and one layer of Belly, 12 sc, 12 sc on Belly only.
Attach Belly to Front Legs: Hold Belly to Front Legs, RS to RS. Align so the next st of the Belly is touching the marker on the back of the Front Leg Leg (bent leg). Hold work with legs nearest to you. Working through one layer of Belly and one layer of Front Legs, 12 sc from marker to marker, 12 sc on Belly only. (113)
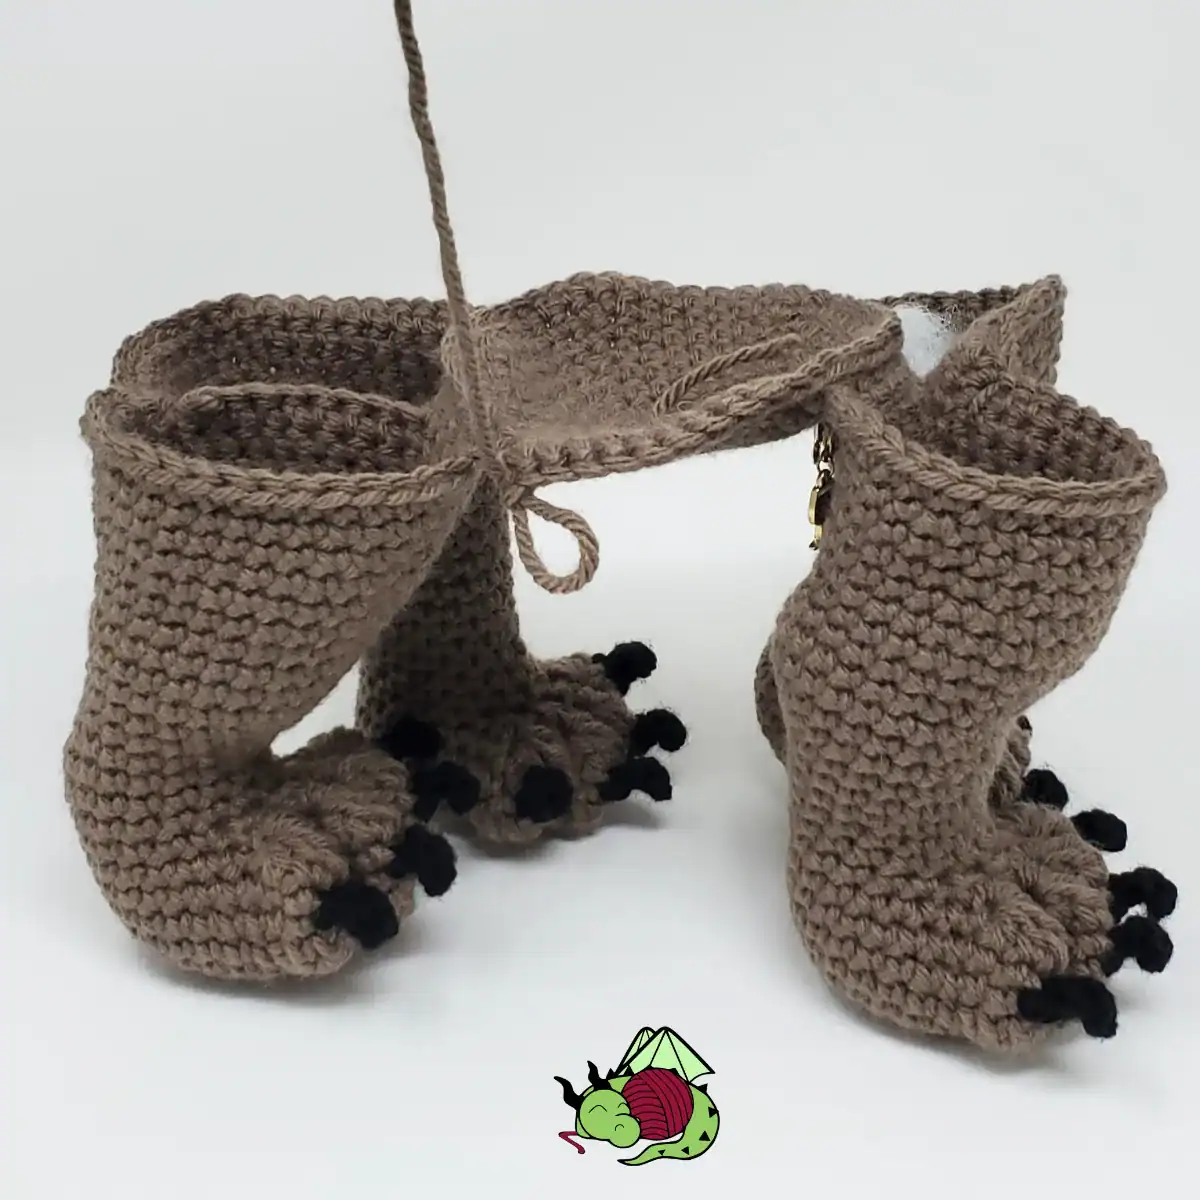
Note: Do not work internal attachment sts going forward. Work around the outside of the legs and belly. Your starting stitch will be in front of his right hind leg.
Rnd 27: 41 sc, dec, 8 sc, dec, 48 sc, dec, 8 sc, dec. (109)
Rnd 28: 41 sc, dec, 6 sc, dec, 48 sc, dec, 6 sc, dec. (105)
Rnd 29: 48 sc, dec, 46 sc, dec, 7 sc. (103)
Rnd 30: 48 sc, dec, 44 sc, dec, 7 sc. (101)
Rnd 31: 48 sc, dec, 42 sc, dec, 7 sc. (99)
Rnd 32-36: Sc evenly around. (99)
(Begin Rump.)
Rnd 37: 3 sc to move starting st, place marker in same st (new last st of rnd), 41 sc, ch 12, skip 57, sc in marked st. (42 sc, 12 chs)
Rnd 38: 41 sc, 12 sc in chs, right side facing the hole for the shoulders, sc. (54)
Rnd 39: [7 sc, dec] 6 times. (48)
Rnd 40: [6 sc, dec] 6 times. (42)
Rnd 41: [5 sc, dec] 6 times. (36)
Rnd 42: [4 sc, dec] 6 times. (30)
Rnd 43: [3 sc, dec] 6 times. (24)
Rnd 44: [2 sc, dec] 6 times. (18)
Rnd 45: [Sc, dec] 6 times. (12)
Rnd 46: Dec 6 times. (6)
Stuff hind legs and rump.
Cut yarn. Thread needle through front loops of remaining 6 stitches. Pull tight to close. Weave in end.
Back and Shoulders
Rnd 37: With TAUP, sc join in 1st st left of the rump (just ahead of his right hind leg), sc in same st, 56 sc, 12 sc in backs of chs. (70)
Rnd 38: 58 sc, dec, 8 sc, dec. (68)
Rnd 39: 58 sc, dec, 6 sc, dec. (66)
Rnd 40: 58 sc, dec, 4 sc, dec. (64)
Rnd 41: 58 sc, dec, 2 sc, dec. (62)
Rnd 42: 58 sc, dec twice. (60)
Rnds 43-45: Sc evenly around.
Stuff shoulders and back.
Rnd 46: [8 sc, dec] 6 times. (54)
Rnd 47: [7 sc, dec] 6 times. (48)
Rnd 48: [6 sc, dec] 6 times. (42)
Rnd 49: [5 sc, dec] 6 times. (36)
Rnd 50: [4 sc, dec] 6 times. (30)
Rnd 51: [3 sc, dec] 6 times. (24)
Finish stuffing.
Rnd 52: [2 sc, dec] 6 times. (18)
Rnd 53: [Sc, dec] 6 times. (12)
Cut yarn. Thread needle through back loops of every other remaining stitch. Pull tight to close. Weave in end.
Chin
With GOLD, ch 2.
Rnd 1: 6 sc in second ch from hook. (6)
Rnd 2: [2 sc, inc] twice. (8)
Rnd 3: [3 sc, inc] twice. (10)
Rnd 4: [4 sc, inc] twice. (12)
Rnd 5: [5 sc, inc] twice. (14)
Rnd 6: [6 sc, inc] twice. (16)
Bind off and weave in ends.
Press flat. Do not stuff.
Set aside.
Tip of Beak
With GOLD, ch 2.
Rnd 1: 6 sc in second ch from hook. (6)
Rnd 2: Inc in each st around. (12)
Rnd 3: Skip 6, 6 sc, leave skipped sts for later use. (6)
Rnd 4: Sc evenly around.
Rnd 5: [Sc, dec] twice. (4)
Cut yarn. Thread needle through front loops of remaining 4 stitches. Pull tight to close. Weave in end.
Stuff lightly.
Beak and Head
Rnd 3: Sc join in 1st skipped st of Rnd 2 of the beak, sc, inc, 2 sc inc. (8)
Rnd 4: [Sc, inc] 4 times. (12)
Rnd 5: [2 sc, inc] 4 times. (16)
Rnd 6: [3 sc, inc] 4 times. (20)
Rnd 7: [4 sc, inc] 4 times. 4 sc to move starting st. (24)
Rnd 8: 16 sc, Hold the last rnd of the Chin to the RS of the work. Working through both layers of the last rnd of the Chin and the next st, 8 sc.
Chin should be centered under the beak.
Rnd 9: Change to IVO, [3 sc, inc] 6 times. (30)
Rnd 10: Working in FLO, [Sc, picot (see Special Stitches), sc] 15 times.
Rnd 11: Working in exposed back loop of Rnd 9, [4 sc, inc] 6 times. (36)
Rnd 12: Working through both loops, [5 sc, inc] 6 times. (42)
Rnd 13: [6 sc, inc] 6 times. (48)
Rnds 14-17: Sc evenly around.
Rnd 18: Working in FLO, [sc on head, ch 6, sc in second ch from hook, 4 sc down ch, sc in next st on head] 24 times. Mark the 1st exposed back loop of Rnd 17. It will be difficult to find later. (24 one-row feathers)
Rnd 19: Working in both loops of Rnd 18, sc, [4 sc in back of chs, inc in last ch, picot, inc in next st, 4 sc, dec on 2 sts between feathers]. Last decrease will include 1st st of previous rnd. (24 feathers.
Rnd 20: Working in exposed back loops of Rnd 17, 32 dc, 16 sc. (48)
Rnd 21: Working in FLO, [sc, ch 11, sc in second ch from hook, 9 sc down ch, sc in next st on head] 16 times, working both loops, 16 sc. Mark the 1st exposed back loop of Rnd 20. It will be difficult to find later. (16 one-row feathers)
Rnd 22: Working in both loops of Rnd 21, sc on head, [in backs of chs, sc, hdc, 4 dc, 2 hdc, sc, sc inc in last ch, picot, sc inc in next st, sc, 2 hdc, 4 dc, hdc, sc, dec on 2 sts between feathers] 15 times, in backs of chs, sc, hdc, 4 dc, 2 hdc, sc, sc inc in last ch, picot, sc inc in next st, sc, hdc, 5 dc, hdc, sc, 17 sc on head. (16 feathers, 48 sc total)
Rnd 23: Change to TAUP, working in exposed back loops of Rnd 20, 32 dc, 16 sc. (48)
Rnd 24: Working in both loops, 5 sc, working in FLO, [sc on head, ch 16, sc in second ch from hook, 14 sc down ch, sc in next st on head] 12 times, 19 sc on head. Mark the 1st exposed back loop of Rnd 23. It will be difficult to find later. (12 one-row feathers, 48 sts total)
Rnd 25: 5 sc, working in both loops of Rnd 24, sc on head, [in backs of chs, sc, hdc, 9 dc, 2 hdc, sc, sc inc in last ch, picot, sc inc in next st, sc, 2 hdc, 9 dc, hdc, sc, dec on 2 sts between feathers] 11 times, [in backs of chs, sc, hdc, 9 dc, 2 hdc, sc, sc inc in last ch, picot, sc inc in next st, sc, 2 hdc, 9 dc, hdc, sc, 20 sc on head. (12 feathers, 48 sc total)
Rnd 26: 5 sc, working in exposed back loops of Rnd 23, 24 dc, working in both loops of Rnd 25, 3 sc. Do not finish round.
Bind off leaving long tail for sewing.
Stuff beak. Head will be stuffed during attachment.
Optional, but encouraged: Block feathers before attaching head to body.
To block the feathers, set the head over a ball of yarn or small bowl and lay all the feathers out flat on a blocking board or towel. Pin them in place, giving them a slight stretch. Using a squirt bottle full of water, spray all the feathers until they are good a wet. (no need to wet the middle of the head.) Let dry for about 24 hours. This will take the twist out of the feathers before attachment so you can better see how they lay.
Eye Circles
(Make 2)
With IVO, ch 3.
Row 1: 7 dc in 3rd ch from hook, turn. (see Pattern Notes) (8)
Row 2: Ch 2, dc in same st, dc inc 6 times, dc inc in top of ch-2, turn. (16)
Row 3: Ch 2, dc in same st, dc, [dc inc, dc] 6 times, dc inc, dc in top of ch-2. (24)
Bind off leaving long tail for sewing.
Row 4: With TAUP, starting in ch-2 of Row 3, working the same direction as Row 3, [sl st, picot, sl st] 12 times. (12 picots)
Bind off and weave in TAUP ends and center IVO end.
Lay eye circles along Rnd 11 of the face, directly behind the picot round, with inside IVO edge of the circles touching Rnd 11. Eye Circles should touch at the top, centered above the beak. Sew Eye Circles to face only along Rnd 11.
Insert safety eyes in base of Row 2 of each Eye circle, centered on the eye circle. Do not attach washer!
Find a stitch in the head in Rnd 13 (the last increase round), directly under the post of the safety eye. Insert the post through that stitch. Making sure the safety eye doesn’t make the work pucker or stretch, attach the washer to the back of the safety eye on the inside of the head.
Left Eyelid
(Owlbear’s left)
With TAUP, ch 9.
Row 1: Sc in second ch from hook, ch 6, skip 6, sc in last ch, ch 6, turn. (2 sc, 12 chs)
Row 2: Sc in second ch from hook, 4 sc down ch, sc, sc in each of 6 chs, sc. (13)
Bind off leaving long tail for sewing.
Right Eyelid
(Owlbear’s right)
With TAUP, leaving a long starting tail for sewing, ch 9.
Row 1: Sc in second ch from hook, ch 6, skip 6, sc in last st, turn. (2 sc, 6 chs)
Row 2: Ch 1, sc, sc in each of 6 chs, sc, Foundation sc (see Special Stitches) 5 times. (13)
Bind off and weave in this end only. Starting tail will be used for attachment.
Pin eyelids in place with last round edge facing up and starting ch on bottom of safety eye. Tilt at a dramatic angle (more than you think necessary). I angled mine to be in line with the lower jaw.
Head Attachment
Head will not be stuffed when pinning attachment.
Hold head to body, making sure the beak is vertical. Align head with beak centered between the front legs, and bottom of head/neck 4-5 rounds from where the front legs are attached to each other. This will seem very low.
Pin the center of the top of the head (between the 6th and 7th TAU feather) to the shoulder, five rounds from the center point. Do not pin to the center point of the shoulders or your owlbear will be looking up at the sky. Pin around the outside of the head where it touches the shoulders.
Using the pins as a guide, with the tail from the head, sew ¾ around the head before stuffing.
Add stuffing to the head before finishing the attachment. Be sure beak is sufficiently stuffed. Finish sewing attachment.
Flop feathers back over the shoulders and smooth with your hands. Further feather blocking while on the body is optional.
If the head is positioned correctly, the owlbear should be looking straight ahead, not looking up or to either side.
Tongue
With PNK, ch 2.
Rnd 1: 6 sc in second ch from hook. (6)
Rnds 2-3: Sc evenly around.
Bind off leaving long tail for sewing.
Do not stuff. Press flat.
Using sewing tail, sewing through both layers of the last rnd of the tongue, sew the tongue into the mouth along the line where the chin attaches to the upper beak.
Weave in end.
Tail
With TAUP, ch 2.
Rnd 1: 6 sc in second ch from hook. (6)
Rnd 2: [Sc, inc] 3 times. (9)
Rnd 3: [2 sc, inc] 3 times. (12)
Rnd 4: [3 sc, inc] 3 times. (15)
Rnd 5: [4 sc, inc] 3 times. (18)
Rnd 6: [Sc, dec] 6 times. (12)
Bind off leaving long tail for sewing.
Do not stuff. Press flat.
Using sewing tail, sewing through both layers of the last rnd of the tail, sew to bum, centered, about eight rounds from the peak of the bum. Weave in end.
Posing Your Owlbear
When posing your owlbear, make sure his feet are in a “walking” pattern. He’s a man on the move!
The bent leg on the left front will still touch the ground, but more on the toes. The right front leg will be straight down, the right rear leg will be back behind the line of the bum and the left rear leg will be reaching forward, like he is planting that foot as he steps. He will be most balanced if you pose his legs this way.
On the face, gently pull the Eye Circles forward along the top to create a crest that accentuates his face.
© Hooked by Kati LLC 2017-2026

Crochet Pattern FAQ
A: Yes! This is a free crochet pattern you can use directly on the blog. It includes all instructions needed to complete the project without purchasing the PDF.
I think of my free crochet patterns a bit like a fun-size candy bar—same great ingredients, just a smaller experience. They’re complete patterns meant to be followed right from the blog, but they also give you a chance to see whether my pattern-writing style works for the way you crochet before investing in one of my premium designs.
If you prefer the king-size experience, the printable PDF versions include color photos, progress check boxes, and extra guidance for trickier sections. Available at shop.hookedbykati.com.
A: This pattern is written for advanced crocheters. It may not be the best pattern for a beginner. However, it is a great pattern for those who are just getting into amigurumi shaping and would like to see what crochet can really do when you apply the right techniques.
A: You may sell finished items made from this pattern, but you may not redistribute or sell the pattern itself. This ensures free patterns remain accessible while respecting the designer’s work.
A: Yes, you can change the size by using a different yarn weight and hook size. I have a great post all about this called “Making Ami Bigger Without Changing the Pattern.” Keep in mind that this may also change the proportions slightly, so check your gauge, and make sure it creates a square swatch.
Read through the pattern notes carefully and check the tutorial links included in the pattern. You can leave a comment on the pattern post and Kati, the designer, will do her best to help. You can also email the designer at kati@hookedbykati.com. The Facebook Group is also very helpful as many of the people in it have finished a HbK pattern (if not several).
Yes. You can make this whole pattern without having to sew anything! The beak and wings are crocheted right onto the body as you make it.
More Patterns
Charlie the Celestial Dragon
Toby the Newborn Dragon
Vincent the Dragon
One Round Up Post
Share Your Work!
Use #hookedbykati or tag @hookedbykati on social media.
Join the community in the Epic Amigurumi Patterns & Crochet Inspiration Facebook Group to share your progress or ask questions.
You may sell items made from this pattern. Please credit Hooked by Kati.
Do not copy, sell, or distribute this pattern — it’s protected and a lot of work goes into each design!
If you run into a snag, reach out — I’m always happy to help! I answer emails Monday – Friday. 8-5.

Kati is a crochet pattern designer, dragon obsessive, and certified geek who has been turning yarn into fantasy creatures since 2016. Her patterns lean heavily toward dragons, fantasy beasts, and whatever her brain decides is a good idea at 2am. She is proudly anti-AI crochet and very pro-finishing-your-WIPs (she’s working on it). When she’s not crocheting something with too many horns, she’s probably watching something nerdy or playing dog agility with her two American Hairless Terriers. Want to work together or just say hi? Contact her here.